• Welcome to the Yamaha MT-09 / FZ-09 Forums. Member registration disables ads and allows you to post and share. Register Here.

Moving instruments forward maintaining windscreen


msesma

0
Joined
Oct 3, 2015
Messages
49
Location
Madrid (Spain)
One of the few annoying things about my new MT-07 is where the instruments are placed. I have to look very far from the road in order to se my speed or revs.

I decided to mov instruments forward but I wanted to maintain my windscreen. Fortunately it was much more easy than I initialy thought. This modification can be done in less than two hours and is fully reversible: No part of the bike or the windscreen is modified at all, so you can revert the changes whenever yopu want!

I have a Puig Turist windshield but I think that this trick can be applied to others with minimal modifications.

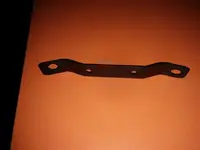
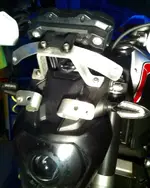
The only part that I needed to make was a small aluminium platen. I used s 2x20 aluminium platen giving it shape by hand helped with a vice. The original screws can be used although I recommend using two slightly longer screws for the upper windscreen fixation and put an adittional self locking nut after the silentblock. Also, another two self blocking nuts will be necessary to atatch the instruments to the new plate.

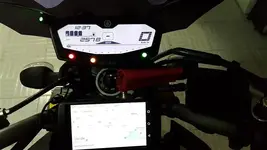
I have added also an aluminium case for my phone that I also use as GPS unit in the space left free by the instruments.

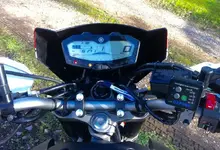
The instruments are now some centimeters lower,. It does not affect its visibility and allows reaching the contact key easily.

And some images detailing the process:

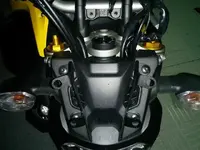
View attachment 2684
Windshield and instruments removed.

View attachment 2685
The aluminium plate folded, drilled and painted.

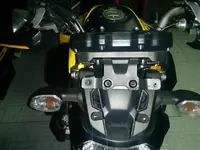
View attachment 2686
Detail of the instruments attached to the new plate

View attachment 2687
Another view: The key is easily reachable

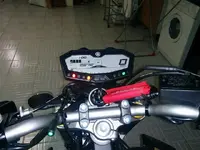
View attachment 2688
My cockpit including GPS

View attachment 2689
A closer view

View attachment 2690
And a side view: The windscreen is slightly more vertical, what is good. Sorry for the handward glitter.
 

Attachments

  • IMG_20151228_121115 (Custom).webp
    IMG_20151228_121115 (Custom).webp
    32.8 KB · Views: 3,321
  • IMG_20151228_181740 (Custom).webp
    IMG_20151228_181740 (Custom).webp
    10.1 KB · Views: 3,160
  • IMG_20151228_182254 (Custom).webp
    IMG_20151228_182254 (Custom).webp
    32 KB · Views: 3,353
  • IMG_20151228_125635 (Custom).webp
    IMG_20151228_125635 (Custom).webp
    34.4 KB · Views: 3,363
  • 20151229_123413 (Custom).webp
    20151229_123413 (Custom).webp
    23 KB · Views: 2,594
  • 20151229_123347 (Custom).webp
    20151229_123347 (Custom).webp
    15.6 KB · Views: 3,995
  • IMG_20151229_123444 (Custom).webp
    IMG_20151229_123444 (Custom).webp
    19.3 KB · Views: 3,149
A bonus would be that it makes the ignition switch easier to reach - definitely a good idea.

I have the same Puig screen, so I may have a go at doing this mod.
 
Have you got the dimensions for the bracket as I would like to do this to my MT.

as i can pop down to the hangar and just make something up in 10mins or so.
 
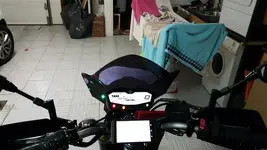
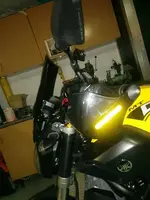
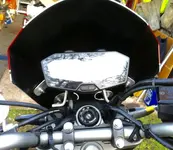
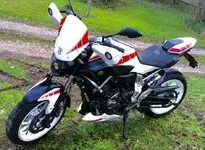
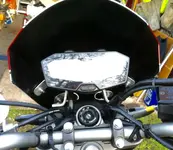
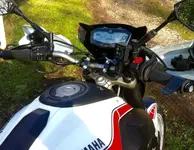
My bike has a close-fitting MT-09 type Puig screen. GAZ had to make special brackets to mount it. I can see the speedo when wearing my J1 Schuberth open-face but it is hidden from my view when I wear my Schoei GT Air helmet. I dislike the low position of the speedo and wanted to raise it into the line of sight. Consequently, I had to make another set of special brackets, using aluminium strips that I had 'squirrelled' away and kept in the shed. The design and fitting is now complete, although still needs dismantling to fettle and polish the brackets, paint them all black and replace the cheese-head screws with stainless dome-head.

So here are some prototype photos :-

View attachment 2750

Apologies for the grainy photo - it was dark in the shed!

View attachment 2751

Ignition key access is much better. I used alloy crush-fit captive M6 nuts in the brackets, so that I can easily slip the screen off by undoing 4 screws from the front.

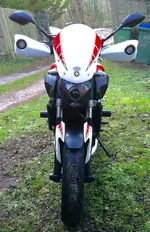
View attachment 2752

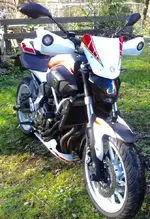
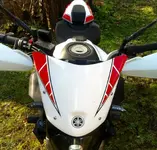
This general view shows the easily-seen white frontage, enhanced by LED illuminated Acerbis hand-guards. With my Hi-Viz over-vest, the traffic know I am there! They probably think I am Police!

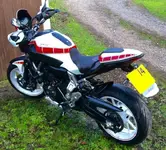
View attachment 2753

If you look closely, you can see my temporary Winter splash guard, slightly extending the rear number plate. It has eliminated the rear seat and my back getting striped with grime. I'll pop it off in the Summer.
 

Attachments

  • IMG_0661.webp
    IMG_0661.webp
    52.2 KB · Views: 2,308
  • IMG_0662.webp
    IMG_0662.webp
    57.8 KB · Views: 2,300
  • IMG_0667.webp
    IMG_0667.webp
    85.6 KB · Views: 2,348
  • IMG_0668 (1).webp
    IMG_0668 (1).webp
    84 KB · Views: 2,379
Last edited:
I have finally fettled the speedo brackets, painted them satin black and finished the fix - or so I thought. Whilst the speedo is now easily within line of normal sight, I was experiencing helmet wind noise and buffeting, something that has dogged me ever since I bought the bike. GAZ2212 had fitted an MT-09 screen (which is why I had to devise a completely different way of mounting the speedo) but I suspected that the air flow over my head was not ideal for my smaller stature and type of riding. Even my reasonably quiet Schuberth and Shoei helmets were roaring and buffeting at speed due to turbulence. However, if I stood up on the pegs and got my head into the air stream all became quiet.

So I realised that the air flow created by the screen was deflecting above my chest but not cleanly around my head. I decided to cut off the top 4 or 5 inches from the screen. I recruited a specialist plastics machine shop to neatly shorten the screen, happily without any damage to the paintwork (Phew!). I lacquered over the cut, fitted the shortened screen and went for a ride - it was raining too!

All wind blast is still kept off my chest but my helmet noise has completely gone! Hurray! Great result. My head must now be sitting in clean air and the high-tech helmets are working as they are designed to do. Here are a few photos showing the original screen with raised speedo and the short screen with raised speedo.

View attachment 2791View attachment 2792View attachment 2793View attachment 2794View attachment 2795View attachment 2796
 

Attachments

  • IMG_0665.webp
    IMG_0665.webp
    89.2 KB · Views: 2,179
  • IMG_0715.webp
    IMG_0715.webp
    88.1 KB · Views: 2,092
  • IMG_0662.webp
    IMG_0662.webp
    57.6 KB · Views: 2,193
  • IMG_0713.webp
    IMG_0713.webp
    79.8 KB · Views: 2,375
  • IMG_0718.webp
    IMG_0718.webp
    62.9 KB · Views: 2,094
  • IMG_0717.webp
    IMG_0717.webp
    79.7 KB · Views: 2,166
I'm pretty sure that if someone were to make a few of these brackets they would easily find a market for them on here - myself included.
 
I agree with Donut I would buy some of them, I am actually looking to buy the forward mounting brackets now.

Great work there Scim77! Looks great, good addition to what was already a stunning example.
 
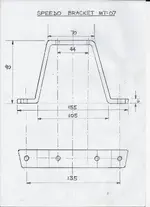
Here is my sketch of the main support bracket that holds the speedo and the top screen plate. I used 25mm wide aluminium strip, 6mm thick, fashioning it to shape by patiently bending and hammering in the vise, rolling the corners where possible and then polishing to tidy up.

This is the type of strip:-

ALUMINIUM Flat Bar / Strip (Various Diameter and Length Options) | eBay

View attachment 2797

The upper and lower screen support brackets have to be designed to suit your particular type of screen and depending on how you want it to sit relative to the headlamp and speedo head. I used much lighter 1mm thick ally strip for the brackets that screwed directly to the screen.
 

Attachments

  • Scan 2016-2-25 18.47.31.webp
    Scan 2016-2-25 18.47.31.webp
    41.3 KB · Views: 696
Hi lads. We all need to thank msesma too, for triggering interest in this worthwhile modification. He was able to retain the nice Puig brackets, whereas mine was a hybrid screen arrangement and needed a different approach.
There are always several ways of doing a job. For example, I could have used steel strip for the speedo mount, but I happened to have ally in stock already. The hole spacing dimensions on my bracket are dictated my the Yamaha fixing points but the other dimensions can easily be changed, offering different speedo height and screen positions.
Moving the speedo up and forward is a major improvement in the bike's functionality and well worth considering.
Now I just have to sort out that crazy rear tyre!!!!! :confused:
 
Crazy rear tyre??

Hi Eddie
I think that the rear tyre is far too wide. It is a prime example of marketing style over substance. It inhibits the bike from being more flickable and I am sure that it would handle better if a narrower rear tyre was fitted. I will be fitting a more rounded 170.60.17 when the current tyre needs replacing. A 160.60.17 would be even better, but it won't fit the rim. The rotating mass of the heavy 180.55.17 adds to the gyroscopic reluctance to change direction and is consequently more difficult for the rear shocker to control. The flattish profile also tends to make the bike kick up in mid-bend if irregular surfaces are met. Narrower lighter tyres are less susceptible to this and would easily give us the grip we need for the weight and power of the MT-07.
There have been other threads that have covered this topic, particularly from Gregjet.
 
I'm sure the theory's good, but doesn't a thinner tyre equal less grip?

Having said that, no disrespect at all for other peoples preferences, but I quite like fat tyres from a visual point of view. Putting a skinny one on the MT07 would look weird to me even if it improves handling.
 
In my opinion that was a major factor when I was a child "look at that rear tyre listen to the sound" and to take that away would be criminal again in my opinion.

You're probably correct in your estimations.
Bike is plenty flick-able for anyone's road needs unless you're some sort of pro road racer, it has never crossed my mind that this tyre is far too wide.

I know the rear wheel is taken from the MT-09, but surely Yamaha has done their research and worked out that this tyre is just as good on the MT-07 as it is on the MT-09


Back
Top